8 Essential Water Heater Cleaning Steps Most People Ignore
8 essential water heater cleaning steps most people ignore
There’s a quiet appliance sitting in most homes that rarely gets attention until something goes wrong. It doesn’t make noise, doesn’t demand upgrades, and doesn’t show visible signs of wear—until it suddenly does. The water heater falls into that category. People rely on it daily, yet overlook one simple truth: like anything else that works hard, it needs maintenance to stay efficient.
If you’ve ever noticed your hot water running out faster than usual, strange noises from the tank, or a slight metallic smell, chances are your water heater is asking for help. The problem is, most cleaning advice online sticks to the obvious—flush the tank, check the valve, and call it a day. But there are deeper, often ignored steps that make a real difference.
This isn’t just another checklist. It’s a closer look at the details people tend to skip, the ones that quietly affect performance, energy bills, and lifespan.
step 1: shutting down properly isn’t as simple as flipping a switch
Most people think turning off a water heater is straightforward. Switch it off and you’re done. But there’s more to it, and skipping these finer points can cause issues later.
For electric heaters, cutting power from the breaker is only the beginning. Many forget to verify that the unit is completely disconnected. Residual current can still pose risks during cleaning, especially when dealing with heating elements.
Gas heaters require even more attention. Turning the thermostat to “pilot” isn’t always enough. You should also shut off the gas supply valve and give the system time to cool down. Rushing into cleaning while the tank is still hot not only risks burns but can disturb sediment in unpredictable ways.
This step is often ignored because it feels routine. But doing it thoroughly sets the stage for everything else. Think of it as preparing a workspace—if the foundation isn’t safe, every step that follows carries unnecessary risk.
step 2: draining partially before flushing completely
A full flush is commonly recommended, but very few people talk about partial draining beforehand. This small adjustment can significantly improve cleaning results.
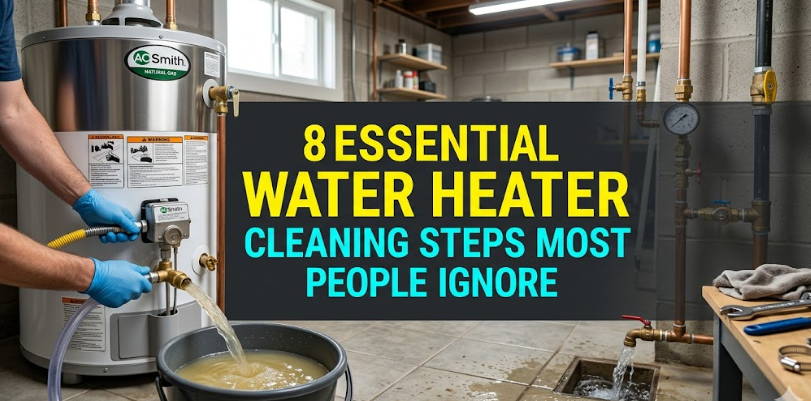
When you open the drain valve immediately for a full flush, the rushing water can stir up sediment and cause clogging near the valve. Instead, draining a portion first allows heavier debris to settle gradually.
Here’s what happens when you do it right: the initial drain removes the loose particles, reducing pressure on the system. Then, when you perform the full flush, the water flows more smoothly, carrying out deeper deposits that would otherwise remain stuck.
Skipping this step doesn’t seem like a big deal, but over time, sediment builds up in layers. A rushed flush only removes the top layer, leaving the rest to harden further.
step 3: cleaning the drain valve itself
This is one of the most overlooked aspects of water heater maintenance. The drain valve is often treated as a simple exit point, but it’s also a place where debris accumulates.
After draining the tank, take a moment to inspect the valve. Mineral deposits and small particles can get lodged inside, restricting future flow. If left unchecked, this can make the next cleaning process frustrating or even impossible.
Cleaning the valve involves gently removing debris using a small brush or flushing it with clean water. In some cases, replacing the valve entirely may be the best option, especially if it shows signs of corrosion.
Ignoring this step is like cleaning a pipe but leaving the faucet clogged. The system won’t function as efficiently as it should.
step 4: inspecting and cleaning the anode rod
The anode rod is one of the most critical components in a water heater, yet many homeowners don’t even know it exists. Its job is to attract corrosive elements in the water, preventing the tank from rusting.
Over time, the rod deteriorates. That’s normal. But if it’s completely worn out, the tank becomes vulnerable to corrosion.
Removing and inspecting the anode rod during cleaning can extend the life of your heater significantly. If it’s heavily corroded or reduced to a thin wire, it’s time for a replacement.
Cleaning it lightly can also help if it still has some life left. This step isn’t glamorous, and it requires a bit of effort, which is why people skip it. But it’s one of the most valuable things you can do.
step 5: addressing sediment at the bottom manually
Flushing removes most sediment, but not all of it. Some particles settle at the bottom and harden over time, forming a stubborn layer.
Many people assume flushing is enough, but manual intervention can make a big difference. After draining, you can use a flexible tool or even gentle water agitation to break up these deposits.
This step requires patience. It’s not about force but persistence. Breaking up hardened sediment improves heating efficiency because the heating element can transfer heat more effectively.
Ignoring this leads to higher energy consumption and uneven heating. It’s one of those hidden inefficiencies that quietly increases your utility bills.
step 6: cleaning the heating elements or burner assembly
For electric water heaters, the heating elements are directly responsible for warming the water. Over time, mineral buildup can coat these elements, reducing their efficiency.
Removing and cleaning them carefully can restore performance. It’s a delicate process—too much force can damage the element, but gentle cleaning can remove buildup effectively.
Gas heaters have a burner assembly instead. Dust, debris, and soot can accumulate here, affecting combustion. Cleaning the burner ensures consistent heating and reduces the risk of incomplete combustion.
This step is often skipped because it feels technical. But even a basic inspection and light cleaning can make a noticeable difference.
step 7: flushing with controlled pressure, not force
There’s a common misconception that higher water pressure means better cleaning. In reality, excessive pressure can disturb internal components and cause damage.
A controlled flush, where water flows steadily but not aggressively, is far more effective. It allows sediment to be carried out gradually without stressing the system.
This approach also reduces the chances of clogging the drain valve or damaging internal linings. It’s a subtle adjustment, but one that experienced technicians swear by.
People often rush through flushing, turning it into a high-pressure event. Slowing down here leads to better results.
step 8: refilling and testing with attention to detail
Once cleaning is complete, refilling the tank seems straightforward. But this step holds its own set of overlooked details.
Before turning the heater back on, ensure the tank is completely filled. Running a heater without water can damage the heating elements or cause serious issues.
Open a hot water tap while refilling to allow air to escape. This prevents air pockets from forming inside the system.
After refilling, check for leaks around the drain valve, connections, and any components you handled. Turn the power or gas supply back on only after confirming everything is secure.
Testing the system thoroughly ensures that your cleaning effort pays off. It’s the final step, but also the one that determines whether everything was done correctly.
why these overlooked steps matter more than you think
It’s easy to treat water heater cleaning as a once-a-year chore, something to check off a list. But the details you ignore are often the ones that define performance.
A well-maintained water heater doesn’t just last longer—it works better. It heats water faster, uses less energy, and operates more quietly. The difference isn’t always dramatic at first, but over time, it becomes noticeable.
These steps aren’t complicated. They just require a bit more attention and patience. And that’s exactly why they’re often ignored.
real-life perspective: the cost of skipping the details
Consider a situation where someone flushes their water heater regularly but never checks the anode rod. Everything seems fine—until rust-colored water starts appearing. By then, the tank may already be compromised.
Or think about a heater that’s flushed annually but still makes popping sounds. The sediment layer at the bottom remains untouched, slowly reducing efficiency.
These aren’t rare scenarios. They’re common outcomes of incomplete maintenance.
practical tips to make cleaning easier
keeping a simple schedule helps. Instead of waiting for problems, plan cleaning sessions every 6 to 12 months.
use proper tools. A basic wrench, hose, and cleaning brush can go a long way.
take your time. Rushing through the process often leads to skipped steps.
pay attention to changes. Unusual noises, smells, or performance drops are early signs that cleaning is needed.
when to call a professional
While many steps can be done at home, there are situations where professional help is worth considering.
If the anode rod is difficult to remove, if there are signs of corrosion inside the tank, or if the heater hasn’t been cleaned in years, a professional inspection can prevent bigger problems.
It’s not about replacing DIY efforts but complementing them when needed.
the long-term payoff
A water heater that’s cleaned properly doesn’t just last longer—it performs consistently. You get reliable hot water, lower energy bills, and fewer unexpected breakdowns.
These benefits don’t come from one big action but from a series of small, often ignored steps. Each one contributes to the overall health of the system.
When you start paying attention to these details, you’re not just maintaining an appliance. You’re making a practical investment in your home.
frequently asked questions
- how often should i clean my water heater
Most experts recommend cleaning your water heater at least once a year. However, if you live in an area with hard water, doing it every 6 months can help prevent heavy sediment buildup. - what happens if i never clean my water heater
Over time, sediment accumulates at the bottom of the tank, reducing efficiency and increasing energy costs. It can also lead to overheating, strange noises, and eventually damage to the tank. - is it safe to clean a water heater by myself
Yes, basic cleaning steps are generally safe if you follow proper precautions like turning off power or gas and allowing the tank to cool. However, more complex tasks may require professional assistance. - how do i know if my anode rod needs replacement
If the rod is heavily corroded, coated in calcium, or reduced to a thin core wire, it should be replaced. Checking it during annual maintenance is a good practice. - why does my water heater make popping sounds
Popping or rumbling noises are usually caused by sediment buildup at the bottom of the tank. As water heats, trapped moisture within the sediment creates these sounds. - can cleaning improve my water heater’s efficiency
Yes, removing sediment and buildup allows the heater to transfer heat more effectively, which can reduce energy consumption and improve overall performance.
Taking the time to go beyond the basics transforms water heater maintenance from a routine task into something genuinely effective. It’s not about doing more work—it’s about doing the right work, the kind most people overlook but every system benefits from.
About the Author